Build suitable habitats for animals and collect specimens to observe in the classroom.
 |
 |
 |
Monster Sciences Living Things Experiment: Collecting and observing animals
What you will need:
• jars with lid
• paintbrushes
• notepaper and pencil
• magnifying glass (optional)
• camera (optional)
• materials to construct habitats
What you will do:
- You are going to work in a group to find an animal in the school grounds and then build a suitable habitat for it.
- Take the lid off your jar and when you find an animal, use the paintbrush to gently brush it into the jar and then put the lid on tight. Don’t touch the animal – it could bite or sting!
- Use the magnifying glass if you have one to take turns to have a closer look at your animal. Do you know what type of animal it is?
- Now have a good look at the habitat your animal came from. Take notes of everything you notice about it. Where in the school is it? Is it on the ground, under the ground or up in a tree or plant? What plants are around? What soil or rocks? What do you think your animal might eat in this habitat? Is there water around? Is it light or dark? Perhaps you could draw a picture of the habitat.
- If you or your teacher has a camera, take a photo of the animal’s habitat.
- When you get back to your classroom your group is going to make a habitat for your animal and you want it to be close to the natural habitat it came from.
What should happen:
Your group will be able to make a great habitat for your animal and will be able to observe your animal for some time. You will need to make sure that your animal’s needs (food, water, shelter) are being met so that it remains healthy and happy. When you have finished observing your animal, return it to the place where you found it.
Monster Challenges:
• Research your animal and make a poster to display beside the habitat you have made.
Teaching Notes: Monster Sciences Experiment: Living Things LT05
Key Concepts:
• Collecting, observing and displaying animals
• Understanding habitats and how they provide animals needs
Resources:
• Experiment description Living Things LT05 – one copy per student.
• Jars with lids, paintbrushes, notepaper and pencils, materials to construct habitats.
Optional: magnifying glasses and camera.
Lesson Notes:
Begin the lesson by reviewing the needs of animals from Living Things LT04. As a group, discuss what kinds of animals might be found in the school playground. Then discuss which of those might be most suitable to capture to keep in the classroom – ie insects.
As a class read through the proceedure of this experiment and discuss how the students are going to look for animals in the playground. Be very clear about the safety aspects – where they can and can’t go etc. Remind them that they are not to touch any of the animals, even if they think they know what it is. Many insects look alike and what might seem harmless may actually bite or sting! I suggest that you tell students either not to capture spiders or to check with you before they capture a spider – a huntsman, daddy long legs or similar harmless spider is great to keep and observe, so if you are ok with them catching one I would recommend it, but we don’t want them catching spiders with nasty bites!
Demonstrate how to use the paintbrush to sweep the animal into the jar.
Remind students that they are to take careful notes and draw a diagram of the habitat they found their animal in.
When students return to the classroom they need to begin constructing a habitat for their animal. This may involve sending some students to collect soil or leaves from the original habitat while others work on a suitable container. Make sure all the animals needs will be met – food, water and shelter.
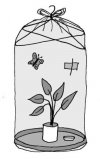
Some animals prefer it dark too, so place the habitats in suitable places in the classroom or provide them with shade. Some diagrams of suggested habitats has been included. You may decide to show it to the students before they begin construction.
What should happen in this experiment and why?
Students should be able to construct quite clever and appropriate habitats for their animals and should then be able to observe them for several weeks, provided the animal’s needs are still being met. You can choose a variety of different methods to record their observations, including a daily diary, a chart or regular photographs. Indeed, if you are able to set up a web camera and use one of the free time lapse photo programs available on the internet you will finish up with a facinating movie of your animal for the students to watch at the end of the unit. I have shown these movies in assemblies when the students have been presenting their animal posters – they were a huge hit!
Follow up question:
• What do we need to do to keep the animals healthy while we have them in the classroom?


Download Attachments
