Make your own thermometer and then explore how a thermometer works.
 |
 |
Weather: Measure the temperature
What you will need:
• A clear plastic bottle
• Water
• Food colouring
• Marker
• Play dough or poster tak
• Strip of cardboard
• Tape
• Drinking straw
What you will do:
1. Pour cold water into the bottle until it is about three quarters full.
2. Add 5 drops of food colouring and stir it with the straw.
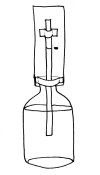
3. Put the straw into the bottle so that it goes into the water at one end and sticks out of the neck of the bottle at the other. Hold it in place with the play dough or poster tak in the neck of the bottle. Make sure no air can get into the bottle other than down the straw.
4. Put the cardboard against the bottle so that it is behind the straw that sticks out. Tape it in place with one piece of tape around the top of the bottle and one piece across the top of the straw.
5. Suck the water gently up the straw until it is about half way up the straw and use the marker to mark the level of the water in the straw on the cardboard.
6. Move your thermometer into a warmer place. What happens to the level of the water in the straw? Mark your result and label it with the number 1.
7. Move it to a cold place or the refridgerator. Mark the new level with the number 2. Try 3 more places and mark and label the water levels with 3, 4 and 5.
What should happen:
The water in the straw should rise when your thermometer is in a warm place, and go down when it is cold. This is because liquids, such as water or the alcohol or mercury in other thermometers, expand when they are heated and shrink when they are cooled.
Monster Challenge:
• There are several different systems for measuring temperature. Can you find out more about them? Clue: they use the letters F, C and K to show which one is being used.
Teaching Notes:
Key Concepts:
• Liquids expand when heated. This can be used to indicate changes in temperature.
Resources:
• Experiment description Weather W03 – one copy per student.
• Investigation Report IR01 – one copy per student
• clear bottles, water, food colouring, markers. play dough or poster tak, strips of cardboard, tape and drinking straws
Lesson Notes:
As a class read through the proceedure of this experiment and explain, or demonstrate, the process.
For the thermometer to work, it needs to have an airtight seal around the straw. Be generous with the play dough or poster tak and fill the neck of the bottle around the straw. Before beginning the experiment students should complete the sections of their Investigation Report IR01 from ”Title to “Hypothesis”.
What should happen in this experiment, and why?
The water in the bottle will expand when it gets warmer, and because the bottle is air tight the air pressure in the bottle will give the water no where to go but up the straw. The reverse will happen when it cools. Be aware that the change in the level of the water won’t be huge but should be noticeable enough if the thermometer exposed to significantly different temperatures.
Follow up question:
• Do you think we could calibrate our thermometer by comparing it to a real thermometer and marking the actual temperature next to level of the water each day?

