Do plants eat? You may be surprised by the answer. Of course they don’t have mouths so they can’t eat like we do, but they need to get their nutrients to grow somehow – in this living things experiment you’ll find out how.
 |
 |
A living things science experiment – Do plants eat?
What you will need:
• fresh celery sticks, preferably with leaves
• glasses or vases – one per group
• food colouring
• water
What you will do:
- Half fill your glass or vase with water.
- Mix in 20 drops of food colouring. Be careful, don’t get it on your clothes or the carpet!
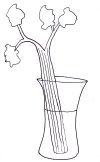
- Place the celery in the glass with the leaf end out of the water.
- Put it in a fairly sunny position and watch it for a few days. Each day note what, if anything, has changed.
What should happen:
Celery is a vegetable, so it is a plant. We are using celery to observe how plants absorb nutrients. The soil contains the nutrients plants need in tiny little particles, or bits. They come from the leaves which fall off the plants and are broken down to form compost with the help of insects such as worms. When it rains the water carries the nutrients out of the soil and into the plant through the roots so the plant can “eat” them – use them to grow.
Monster Challenge:
• Can you draw a diagram showing how trees absorb nutrients? Hint: it’s a bit like how blood moves around our bodies in veins.
Teaching Notes: Monster Sciences Experiment: Living Things LT08
Key Concepts:
• How plants get nutrients Resources:
• Experiment description Living Things LT08 – one copy per student.
• Fresh celery sticks, glasses or vases, food colouring – red is best, water
Lesson Notes:
As a class read through the proceedure of this experiment and discuss how the students are going to work in small groups to set up the experiment. Be sure to talk about how to use the food colouring carefully! Remind the students that this experiment requires patience – you will be observing it over 2-3 days.
Once the experiment is set up students can record, with diagrams, what the celery looks like and label it with the time and date. If you do the experiment in the morning you might be able to see some change by the afternoon, if not the colour should have risen part way up the celery stalk by morning, and a little further each day for the next couple of days. I usually get the kids to draw it 3 times over the course of those days, so you can timetable that accordingly.
What should happen in this experiment and why?
Students should be able to explain how plants collect and transport nutrients using the celery as an example. The pathways they can see the red food colouring travel inside the celery are the same ones used by the growning plants to carry water and nutrients throughout the plant.
Follow up questions:
• Why do we sometimes use fertiliser in our gardens?
• What happens to plants when they don’t get enough water?
• Did you know that it is possible to grow plants without soil. This is called hydroponics. Can you guess how it might work?


