Learn about the force of gravity by making and testing parachutes. Lots of fun!
 |
 |
Forces Science Experiment: Parachutes and gravity
What you will need:
- Fine string or wool
- A clothes peg
- A cotton handkerchief or square of similar fabric .
What you will do:
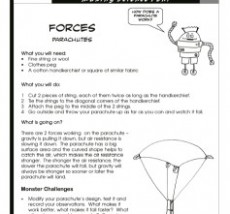
1 Cut 2 pieces of string, each of them twice as long as the handkerchief,
2 Tie the strings to the diagonal corners of the handkerchief.
3 Attach the peg to the middle of the 2 strings,
4 Go outside and throw your parachute up as far as you can and watch it fall
What Is going on?
There are 2 forces working on the parachute – gravity is pulling it down, but air resistance is slowing it down. The parachute has a big surface area and the curved shape helps to catch the air, which makes the air resistance stronger. The stronger the air resistance, the slower the parachute will fall, but gravity will always be stronger so sooner or later the parachute will land.
Monster Challenges
- Modify your parachute’s design, test it and record your observations. What makes it work better, what makes it fall faster? What other shapes could you make? Does size make a difference? What about weight? What other materials could you use, report your findings back to your class.
TEACHING NOTES: Experiment: Forces F01
Topic:
Forces Suitable for Ages: 6 -12+
Key Concepts:
Gravity, Air resistance
Resources:
- Investigation Record IR01- one copy per student
- Experiment Description Forces F01 – one copy per student
- Cotton handkerchief or square of fabric, string, pegs
Lesson Notes:
Begin the lesson with a discussion of forces. Brainstorm what a force is and examples. Ask students to describe what a parachute is and what it does. Ensure they understand that something with a parachute falls more slowly than something without. Tell the students that there are 2 forces acting on the parachute, ask them to predict what they are. You might need to prompt them that one force is pulling the parachute down (gravity) and the other is slowing it down (air resistance). Remind students to listen carefully to instructions, and to OBSERVE their experiment. As a class discuss the experiment prior to undertaking it, and students should complete the sections of their Investigation Report IRO1 from ‘Title to ”Hypothesis”. I prefer to have the students work in pairs because it encourages questioning and discussion. After the initial test allow students to modify and test different parachute designs, but continue to prompt them to predict what will happen and record their observations. At the end of the lesson have students report back on their findings.
What should happen in this experiment, and why?
The results of this investigation will vary depending on how students modify the parachute design, but in general the better the parachute It at capturing and holding air, the more effective it is. Remember that the best way for students to learn is to try things for themselves, so pose the challenges and let them experiment. They may surprise you with their answers and observations!
Follow up discussion questions:
- Following our investigation, what features should the ideal parachute have?
- What could we find out about parachutes in use today and in the past?
Get this experiment here or as part of a bundle of Gravity Experiments here.

